
This post may contain affiliate links. Please read my disclosure policy.
Who doesn’t love gummy bears???
In my house, everyone loves them – even my husband! The kids are a given, but personally, I love love love LOVE gummy bears!
The only thing holding me back from buying gummies in bulk is that they are too limited in flavors. If I’m not mistaken, there’s only about five standard flavors in the market – or at least for Haribo – raspberry, lemon, orange, pineapple, strawberry.
I didn’t mind until I attended a birthday party hosted by a DIY, super hands-on mom and I was amazed by the different flavors she had for her gummy candies.
The theme was Lego so she had created gummy Lego blocks and all the flavors were amazing! I actually had to ask where she got them from – I couldn’t stop myself! I thought they were store-bought, and I was all the more amazed when she said she made all of them herself!
Being the foodie that I am, I asked her if I can call her some time to ask how she made the homemade gummies successfully – because I failed mine a couple of times before.
She was kind enough to say I could drop by sometime so she can show me. And I did! Of course I did!
I was so excited, I was thinking of gummy bears the whole time. If you’re the type that prefers jelly beans, check out how to make great jelly beans here!

What Can Go Wrong with Homemade Gummy Bears
While driving towards my friend’s house, I was thinking of all the things I did that made my gummy bears fail.
Were they too watery? Did I not use enough gelatin? Or maybe too much?
There were a number of things I may have done that I should or shouldn’t have, and I wanted answers.
So there I was, and believe me… I’m not exaggerating when I say my heart was racing really fast. I was like a kid in a candy shop. I was not only excited for what I can do for the kids, I was excited of all the other flavors I can play with once I understand the secret of making gummies.
Out of all the things we discussed, here are the things I learned I did wrong. And I figured these could be common mistakes, so read on.
- Not ‘blooming’ the gelatin.
I am guilty of this! We often think that because the gelatin is very refined, it will immediately dissolve in hot liquid. The thing is, you have to bloom (or otherwise known as hydrate) it first before dissolving it in cool liquid.
To do this correctly, you place a small amount of cool liquid in a shallow bowl and sprinkle the gelatin evenly over the top and let it stand for five minutes.
When you do this, the gelatin will absorb the water and bloom or swell, thus the term ‘blooming.’
Typically, the cool liquid used is water but this can also be done with juice or tea or even wine.
- Mixing the bloomed gelatin in hot liquid
Another thing I apparently did wrong was I added the gelatin to hot liquid. I thought it would dissolve better because the base is hot.
My impatience brought me the doom of the bloomed gelatin. I learned that the base should be cooled first before adding the gelatin. This will make the gelatin stronger in the end.
- Using droppers instead of a spouted measuring cup
The gummy bear molds usually come with droppers. The problem with these droppers is that they add too many air bubbles to the mixture which will ruin the texture of the gummies.
To resolve this problem, it’s better to use a spouted measuring cup for pouring the mixture over the molds.
- Using the incorrect ingredients
While we think that the flavors are endless with homemade gummy bears, there are limits we should take into consideration.
There are ingredients that have enzymes that interfere with the texture of the gel, thus are not best for gummy bears. Some of these are fresh fruits such as kiwi, mango, pineapple, papaya, and guava.
Take note that the keyword here is ‘fresh.’ Canned or preserved versions of these fruits work better with gelatin.
And if you’re like me who’s thinking of adding in some alcohol, please know that too much of it can also ruin the texture of the gummy candies. Stick to the correct proportions to achieve the correct texture.
- NOT using corn syrup and citric acid
Okay, first things first. I’ve said this in a number of my posts before: I try to get rid of corn syrup in my recipes as much as I can.
In this case, since I’m still trying to hack the recipe… I’m keeping the corn syrup for now. But I will explore later on how I can make gummy bears successfully without corn syrup. In which case, I will update you on it later. For now, this will do.
Going back to the main point, we need to use both corn syrup and citric acid for two important purposes.
Both ingredients serve as interfering agents, meaning they help prevent the formation of large crystals in the mixture. This way, we will achieve the waxy and chewy texture that we are looking for in all gummy candies.
Without them, your gummies will be crusty, and the edges will be rough and dry.
On the other hand, citric acid not only brings out the flavor you want to achieve, it also serves as a preservative, making the shelf life of your gummies longer. So basically, adding citric acid is the answer to the question of how to preserve homemade gummy bears.
So now that we’ve debunked the common mistakes in making gummy candies, let’s proceed with the real deal.

Gummy Bears Recipe
Description
Easy gummy bear recipe using Jell-o and other easy to find ingredients.
Notes: Recipe is only for one flavor. You may replicate this for all the other flavors you want using the same procedure, you only have to replace the Jell-o in this case.
Resting Time: 3 days
Detailed Instructions
STEP 1 – Combine the gelatin and citric acid
You need to add both the flavored and unflavored gelatin with the citric acid (optional) first. It’s best to mix them in a microwavable bowl as we will be popping them in the microwave oven later on.
STEP 2 – Bloom the mixture
Add the corn syrup and water. Stir gently with a soup spoon until well combined.
Take note of the operative word: GENTLY. This is very critical because stirring too fast will create air bubbles that will be hard to get rid of.
When everything is well combined, let it sit for 5 minutes to allow the gelatin to bloom.
STEP 3 – Heat the mixture
After blooming the gelatin, stir the mixture gently again then put it in the microwave for 30 seconds on high temp.
Take it out and stir gently, then place it in the microwave again for 15 more seconds. Repeat the process 3 times.
Remember to look out for bubbles. If any bubbles start to form, stop the heating immediately and stir as gently as you can.
STEP 4 – Let the mixture rest
Leave the mixture to set for 10 minutes but stir every 2 minutes to achieve a clearer mixture.
STEP 5 – Spray some cooking spray over the candy molds
Once the candy mixture becomes clearer, spray the molds with cooking spray.
Do not skip this step to avoid the gummies from sticking in the candy molds later on.
STEP 6 – Pour the candy mixture into the candy molds
As I’ve said earlier, do not use droppers. A spouted measuring cup works best for this process.
With that said, slowly pour the mixture into the molds using your spouted measuring cup. Remember not to fill each mold to the brim. If one overflows by accident, you can try using a paper towel to absorb some of the excess or just leave it as is.
STEP 7 – Allow the gummies to rest
Let it sit for at least 30 minutes before putting it on the fridge for another 30 minutes.
STEP 8 – Dehydrate the gummies
Check the gummies and see if they are firm enough to be pushed out of the molds. If they are, pop each of them out and place them on a baking sheet or cutting board lined with wax paper. Make each bear stand upright and leave for 48 hours.
After 48 hours, lay each bear on their backs and leave for another 24 hours. This process will shrink the gummies a bit and will help dry them out. This is crucial in making the gummy bears as chewy as the store bought ones.
STEP 9 – Store the gummies
Once the gummy bears are ready, store them in an airtight container and keep them in a cool, dry place. This should make the candies last for a few weeks.
Keeping them in the fridge will make them last a little longer.
If the gummies are sticking to each other, sprinkle a pinch of cornstarch or icing sugar and toss them to keep them from sticking. I hope you’ve enjoyed learning how to preserve homemade gummy bears!
Print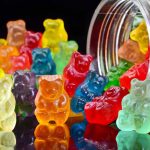
How to Preserve Homemade Gummy Bears
- Total Time: 20 minutes
- Yield: 50 pieces 1x
Ingredients
- 1 – 85g box Jell-o gelatin dessert powder – flavor of your choice
- 1 package 7.2g Knox unflavored gelatin powder
- ¼ teaspoon citric acid (optional)
- ¼ teaspoon corn syrup
- ⅓ cup room temp water
Kitchen equipment you’ll need:
- 2 silicon bear candy molds
- Cooking spray
- Spouted measuring cup
Instructions
- Combine Jell-o, gelatin and citric acid (if using)
- Add corn syrup
- Bloom the mixture
- Heat the mixture
- Let the mixture rest
- Spray some cooking spray over the candy molds
- Pour the candy mixture into the candy molds
- Allow the gummies to rest
- Dehydrate the gummies
- Store the gummies


Notes
Please scroll up to see detailed instructions for each step.
- Prep Time: 5 minutes
- Cook Time: 15 minutes
- Category: Candy
Hi, i am a highschool student and we are doing a an engineering project that says we have to create our own candy brand. We chose to use your recipe for our project but we also need nutrition facts, if you don’t mind, could you please post the nutrition values? Thank you for your time and have a wonderful day :)