This post may contain affiliate links. Please read my disclosure policy.
Oreo Mousse Cake Recipe
Are you a fan of Oreo cookies? If so, get ready to be blown away by the deliciousness of an Oreo Mousse Cake. This decadent dessert combines the rich and chocolatey taste of Oreos with the light and airy texture of mousse, creating a dessert that is truly indulgent.
What makes this cake even more special is its versatility. From birthday parties to dinner gatherings, the Oreo Mousse Cake is sure to impress your guests and leave them craving for more. Plus, with just a few simple ingredients and easy-to-follow instructions, you can whip up this mouthwatering treat in no time.
The secret to achieving the perfect balance between sweetness and creaminess lies in layering crushed Oreos between each layer of mousse and using whipped cream as a topping. Not only does it add an extra burst of flavor, but it also adds a delightful crunch that complements the smoothness of the mousse. So go ahead, grab yourself a slice (or two) of this heavenly creation and immerse yourself in pure bliss.
Gather your ingredients
Now that you’re feeling excited and ready to whip up a delightful Oreo Mousse Cake, it’s time to gather all the necessary ingredients. Think of this step as your treasure hunt, but instead of seeking gold doubloons, you’ll be searching for sweet confections that will make your taste buds dance with joy. From the creamy center of Oreos to rich whipped cream and chocolatey goodness, these ingredients are the building blocks of a dessert masterpiece.
First on our list are those beloved Oreos – who can resist their crisp cookies and luscious filling? You’ll want about 20 of these delectable delights for our recipe. Next is a generous cup of heavy whipping cream, which will provide that light and fluffy texture we all crave in mousse cakes. And let’s not forget about the star ingredient: silky smooth dark chocolate that will melt in your mouth with each bite.
As you gather these items from your pantry or nearby grocery store, take a moment to appreciate how each ingredient plays a crucial role in creating the ultimate indulgence. Allow yourself to get lost in the anticipation of blending them together into a harmonious symphony of flavors. With every item at hand, you’re one step closer to satisfying your sweet tooth and creating memories worth savoring with every spoonful.
Oreo Mousse cake recipe overview
Let’s dive right into making this irresistible Oreo Mousse Cake! First, let’s start by preparing the crust. Crush a whole pack of Oreo cookies and mix them with melted butter until well combined. The crushed cookies will add a delightful crunch to every bite of the cake, while the butter will bind everything together nicely.
Next, press the cookie mixture evenly into the bottom of a springform pan and refrigerate it for about 15 minutes. This step is crucial as it allows the crust to firm up and set properly before adding the mousse layer. By chilling it in advance, you can ensure that each slice of cake has a sturdy base that won’t crumble when serving.
Now comes the star ingredient: mousse! In a large bowl, beat heavy whipping cream until soft peaks form. Add powdered sugar and vanilla extract for extra sweetness and flavor. Then gently fold in crushed Oreo cookies – you can never have too many Oreos! This luscious mixture will be your light and fluffy mousse layer that perfectly complements the rich chocolatey crust.
As we progress through these simple steps, remember to take your time and enjoy the process—baking should be fun! It’s also worth noting that this recipe offers room for customization. If you want to switch things up, try adding some chopped strawberries or even drizzle some melted chocolate over the top for an elevated presentation. Whatever variations you choose, rest assured that this Oreo Mousse Cake will always be a crowd
Tips and Variations: Customize your mousse cake with these ideas
Now that you have mastered the art of making Oreo Mousse Cake, it’s time to take it up a notch by adding some personal touches. Customizing your cake not only adds a unique touch but also allows you to cater to different tastes and preferences. One idea is to incorporate different types of cookies into the dessert. You can try using chocolate chip cookies or even peanut butter cookies for added texture and flavor. Another option is to decorate the top of the cake with fresh fruits like strawberries, blueberries, or raspberries for a burst of color and freshness. This not only adds a visual appeal but also balances out the rich flavors with a hint of tartness.
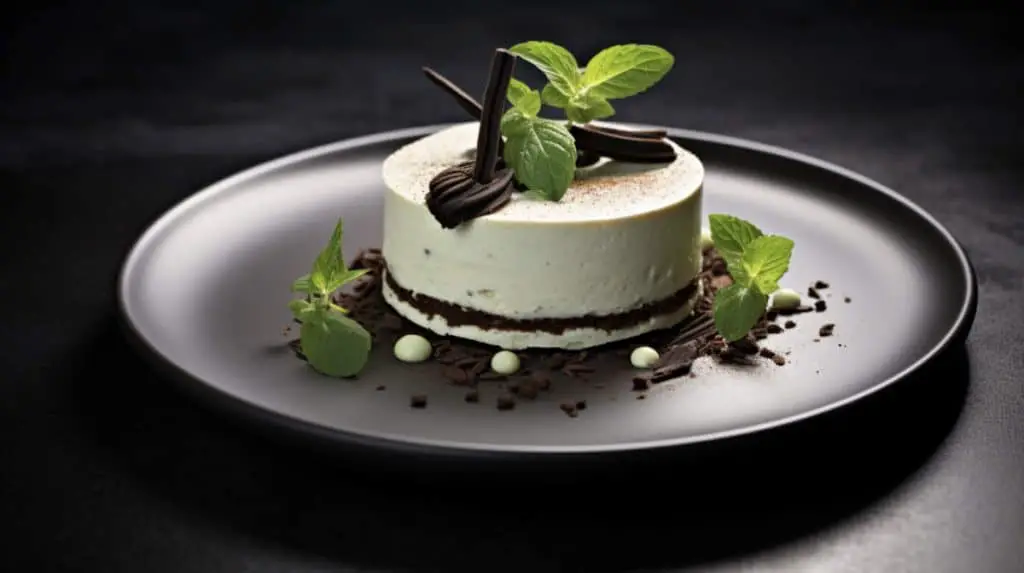
If you’re looking for something more decadent, consider adding layers of ganache between each mousse layer in your Oreo Mousse Cake. The silky smooth texture and intense chocolate flavor will elevate this dessert to new heights. Additionally, you could experiment with flavored whipped creams such as mint, caramel, or coconut instead of regular whipped cream for extra indulgence.
For those who enjoy playing around with textures, why not include some crunchy elements in your cake? Sprinkle crushed Oreos on top or layer them in between the mousse layers for an added crunch that contrasts beautifully with the creamy filling.
By customizing your Oreo Mousse Cake with these creative ideas, you can truly make it your own masterpiece that reflects your personality and culinary flair. The possibilities are endless when
Serving and Storage: How to serve and store your Oreo Mousse Cake
Now that you’ve mastered the art of making an Oreo Mousse cake, it’s time to learn how to serve and store this delectable dessert. To ensure that your cake maintains its delicious texture and flavor, follow these simple tips. First and foremost, make sure to let the cake cool completely before attempting to remove it from the pan. This will prevent any crumbling or breaking during the serving process.
When it comes to serving your Oreo Mousse cake, presentation is key. Consider using a sharp knife or an offset spatula to create clean slices. It’s also helpful to run your knife under hot water between each cut for a smooth and precise finish. And don’t forget about garnishing! A sprinkle of crushed Oreos on top or a dollop of whipped cream can take your dessert presentation up a notch.
When it comes to storing any leftover cake (if there is anything left!), keep in mind that the mousse filling can be delicate. Store it in an airtight container in the refrigerator for up to three days. To maintain its freshness, place a piece of parchment paper or plastic wrap directly on top of the exposed mousse before sealing with the lid. This will help prevent any oxidation or absorption odors from other foods in your fridge.
Overall, serving and storing your Oreo Mousse Cake requires some attention to detail but is well worth the effort when you see your guests’ eyes light up with delight as they savor every creamy bite. So go ahead, put your apron on and get ready to impress with this show-stopping dessert.
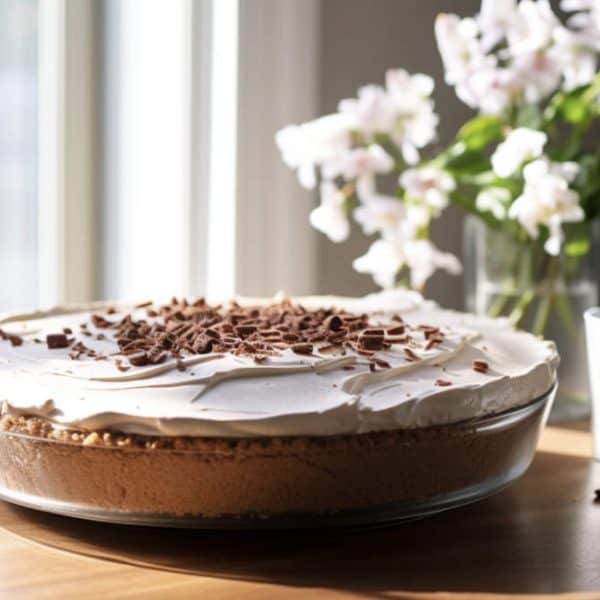
First, let’s talk about serving. To showcase the Oreo Mousse Cake in all its glory, it’s best to slice it into elegant portions. You can use a sharp knife dipped in hot water and wiped clean between each cut to ensure smooth slices. The cake’s luscious layers will be revealed, with the velvety mousse sandwiched between the rich chocolate cake and crunchy Oreo crust.
Frequently Asked Questions
1. Can I use any other type of cookie instead of Oreo for the mousse cake?
While Oreo cookies are the star ingredient in this recipe and provide a distinct flavor and texture, you can certainly experiment with other types of cookies if you prefer. Try using chocolate chip cookies for a classic twist, or even peanut butter cookies for a nutty flavor profile. Keep in mind that the end result might be slightly different, but it’s always fun to get creative in the kitchen!
2. How long does it take for the mousse to set in the refrigerator?
The time required for the mousse to set in the refrigerator is crucial to achieve that perfect, smooth texture we all love. Most recipes recommend refrigerating the mousse for at least 3-4 hours, but longer chilling times can result in an even firmer consistency. If you’re short on time or can’t wait that long, you can place it in the freezer for about 1-2 hours instead. Just remember to keep an eye on it and remove it before it freezes solidly.
3. Is there a substitute for heavy cream if I want a lighter version of this cake?
If you’re looking to make a slightly lighter version of this decadent dessert, there are alternatives to heavy cream that can be used without compromising too much on taste and texture. One option is using whipped coconut cream which adds a subtle coconut flavor as well.
Enjoy this decadent dessert masterpiece!
Get ready to indulge in pure bliss with this exquisite Oreo Mousse Cake. Your taste buds will be dancing in delight as the rich chocolatey flavors meld perfectly with the creamy Oreo mousse. This dessert is truly a showstopper, guaranteed to impress your friends and family.
Every bite of this cake is a harmonious symphony of textures and flavors. The velvety smooth mousse is beautifully countered by the slight crunch of the Oreo crust, creating an addictive combination that you just can’t get enough of. It’s a dessert that not only satisfies your sweet tooth but also leaves you longing for more.
As you take your first forkful, savor the complexity of the contrasting elements at play. Let yourself be transported into a world of pure indulgence, where worries melt away and all that matters is this moment and each delightful mouthful. Whether it’s for a special occasion or simply to treat yourself after a long day, this Oreo Mousse Cake promises to bring joy and happiness with every slice.
So go ahead, gather your ingredients, follow our simple recipe, and create magic in your own kitchen today! Serve it up beautifully on a cake stand or individual plates garnished with fresh berries or whipped cream for an added touch of elegance. Prepare to dazzle both visually and gustatorily as you present this culinary masterpiece – but most importantly, make sure you save some for yourself because once everyone takes one bite, there won
Dietary Considerations:
- Vegetarian: This recipe is suitable for vegetarians.
- Lactose Intolerance: This recipe contains dairy. If you’re lactose intolerant, consider using lactose-free alternatives for the cream and cream cheese.
- Gluten-Free: Oreo cookies contain gluten. To make this recipe gluten-free, use gluten-free chocolate sandwich cookies.
- Vegan: To make this recipe vegan, use vegan chocolate sandwich cookies, vegan butter, coconut or almond whipping cream, and vegan cream cheese.

Oreo Mousse Cake Recipe
- Total Time: 30 minutes
Ingredients
For the Oreo Crust:
- 24 Oreo cookies (with filling)
- 5 tablespoons unsalted butter, melted
For the Oreo Mousse:
- 2 cups (475ml) heavy whipping cream
- 1 cup (240g) cream cheese, softened
- 1/2 cup (100g) granulated sugar
- 1 teaspoon vanilla extract
- 12 Oreo cookies, crushed
For the Topping (optional):
- 8 Oreo cookies, crushed or halved
- Whipped cream
- Chocolate shavings or drizzle
Instructions
- In a food processor, pulse the 24 Oreo cookies until they turn into fine crumbs.
- Mix the Oreo crumbs with the melted butter until well combined.
- Press the mixture firmly into the bottom of a 9-inch springform pan or a pie dish to form the crust. Place in the refrigerator to set while you prepare the mousse.
- In a large mixing bowl, whip the heavy cream until stiff peaks form. Set aside.
- In another bowl, beat the cream cheese, sugar, and vanilla extract until smooth and creamy.
- Gently fold the whipped cream into the cream cheese mixture until well combined.
- Add the crushed Oreos to the mixture and fold gently until incorporated.
- Pour the mousse over the prepared crust and smooth the top with a spatula.
- Refrigerate the cake for at least 4 hours, preferably overnight, to set.
- Before serving, decorate with additional crushed or halved Oreos, whipped cream, and chocolate shavings or drizzle, if desired.
- Release the cake from the springform pan, slice, and serve.


Notes
- Ensure the heavy cream is very cold before whipping; this helps achieve the right consistency.
- The cake can be made a day in advance and stored in the refrigerator.
- For an extra chocolatey touch, consider adding a layer of chocolate ganache on top.
- Category: Dessert